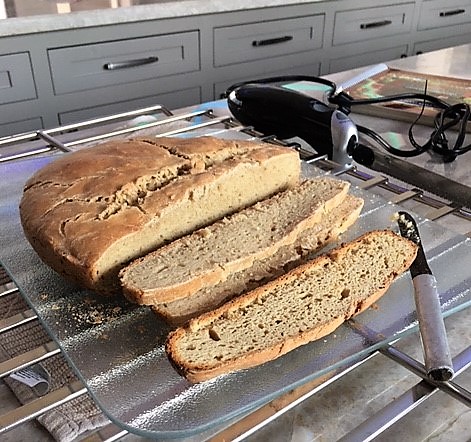
Gluten Free Sourdough – 2 Variations
- Make the water kefir (2 days)
- Make the sourdough starter. (3+ days)
- Make the bread. (16-18 hours): 2 varieties provided for your choice.
Part 1 Make Water Kefir
INGREDIENTS
1 quart water
15 raisins
2-3 Tablespoons water kefir cultures (store bought)
2 Tablespoons Sugar
1 slice lemon
METHOD
- Put 1 quart of water into a jug.
- Stir in sugar until dissolved.
- Stir in water kefir culture.
- Add raisins and lemon slice
- Cover with paper towel or cloth and secure with rubber band.
- Ferment 1-2 days at room temperature, until raisins float up to top.
- Pick out the fruit with a spoon, and discard (optional).
- Taste to ensure sweet and sour – but more sour. Leave to ferment further (6-12 hours) to ensure it is more sour.
- Cover and refrigerate when desired ferment is reached.
- NOTE: cultures are settled to bottom and mixture lasts 1 month refrigerated. The last inch of water and cultures can be re-used into a new batch of kefir water
- NOTE: I am freezing mine and expect that it can last 6 months.
Part 2 Make GF Thick Sourdough Starter
INGREDIENTS – CREATE STARTER (5-7 days)
DAILY – 1 cup (120g) GF flour mix (sorhum + teff/ brown rice/ buckwheat)
DAILY – 1cup spring water/distilled water/ filtered water (minimize chlorinated)
INITIALLY – 2 Tablespoons water kefir (first day only)
INGREDIENTS – REFRESH STARTER (indefinitely ever week: before/after using)
WEEKLY – ½ cup gum-free GF flour (think about flavor and color for the final baked good)
WEEKLY – ½ cup spring water/distilled water/filtered water (minimize chlorinated)
METHOD – CREATE STARTER (10 days)
Morning of Day One: Beginning. In a nonreactive container like a glass or ceramic jar, place ½ cup (about 60 grams) whole grain gluten free flour(s) and ½ cup (4 fluid oz) spring or distilled water and kefir. Using a nonreactive mixing spoon (like a wooden or silicone spoon), mix to combine well. Cover the container loosely, and allow to sit on the counter at room temperature for 8 to 12 hours.
Evening of Day 1: Building. Remove the cover of the container, and add another ½ cup (about 60 grams) whole grain gluten free flour(s) and ½ cup (4 fluid ounces) spring or distilled water. Using a nonreactive mixing spoon (like a wooden or silicone spoon), mix to combine well. Cover the container loosely, and allow to sit on the counter at room temperature for 8 to 12 hours.
Morning of Day 2: Building. Remove the cover of the container, and add another ½ cup (about 60 grams) whole grain gluten free flour(s) and ½ cup (4 fluid ounces) spring or distilled water. Using a nonreactive mixing spoon (like a wooden or silicone spoon), mix to combine well. Cover the container loosely, and allow to sit on the counter at room temperature for 8 to 12 hours.
Evening of Day 2: Building. Remove the cover of the container, and add another ½ cup (about 60 grams) whole grain gluten free flour(s) and ½ cup (4 fluid ounces) spring or distilled water. Using a nonreactive mixing spoon (like a wooden or silicone spoon), mix to combine well. Cover the container loosely, and allow to sit on the counter at room temperature for 8 to 12 hours.
Morning and Evening of Days 3 through 7 and beyond: Building and/or Discarding/Building: Remove the cover of the container, and inspect the contents by tapping the jar on the counter to see if bubbles begin to break the surface of the mixture, and smelling it to see if it has any sour odor at all. If it does bubble and have an odor, discard any relatively clear liquid that has accumulated on top (called “hooch”) + about ⅓ of the volume. Then feed it: Add another ½ cup (about 70 grams) gum-free gluten free flour and ½ cup (4 fluid ounces) spring or distilled water. Using a nonreactive mixing spoon (like a wooden or silicone spoon), mix to combine well. If it doesn’t bubble and have an odor, do not discard but feed with ½ cup whole grain flour and ½ cup water as directed above. Cover the container loosely, and allow to sit on the counter at room temperature for 8 to 12 hours.
Refreshing your active starter. An active starter can be used for baking, then refreshed and stored, covered, in your refrigerator for about a week. After about a week, you should refresh it by removing it from the refrigerator, discarding about ⅓ of the volume (including any clear liquid or hooch from the top), adding ½ cup (70 grams) gum-free gluten free flour and ½ cup (4 fluid ounces) spring water or distilled water, and mixing with a nonreactive spoon. Cover the starter and allow it to sit on the counter for about 12 hours before returning it to the refrigerator. Repeat the process every week for the life of the starter.
NOTE: I refresh mine every Friday evening; and instead of wasting the discarded volume – use it for activating the starter for baking a new loaf.
Part 3 Make GF Sourdough Bread (variation#1 Sandwich Bread Style)
Yield: 1 loaf bread
Best Timings: You can feed your active starter tonight, and leave it out on the counter, loosely covered. Then, when you wake up tomorrow morning, make the bread dough and set it to rise during the day. When you’re about an hour away from dinnertime, bake the loaf and enjoy.
Substitutions:
DAIRY: I use unsweetened non-dairy milks, like pea milk (Ripple). I use butter; but suppose you can replace with a nondairy replacement. I think using ghee may be ideal if you are lactose or whey-sensitive. I don’t think oil will work well instead of butter – changes texture.
INGREDIENTS for Activating Starter:
½-¾ cup cold sourdough starter
½ cup (160 g) GF all-purpose flour
½ cup (225 g) filtered water, @ room-temp
INGREDIENTS to prepare dough
2-½ cups (420 g) GF all-purpose flour (Better Batter)
1-½ teaspoons xanthan gum (omit if your blend already contains it)
1-½ cups (12 ounces) warm milk (about 95°F), plus more by the tablespoon
½ cup (70 g) tapioca starch/flour
4 tablespoons (56 g) unsalted butter, at room temperature
2 tablespoons (25 g) granulated sugar
1-½ teaspoons (9 g) kosher salt
METHOD for Activating Starter 1 Night Before (7pm-ish)
- In a large bowl, stir together the sourdough starter, brown rice flour, and water.
- Cover the bowl with plastic wrap, and set aside at room temperature for 8 – 10 hours, or overnight, until bubbly.
NOTE: There may be some separation, with the top being thick and the bottom more liquid – this is normal.
METHOD for Prepare the Dough (> 4am-ish)
- Grease a standard 9-inch x 5-inch loaf pan and line with parchment paper. Set the pan aside.
- In the bowl of a stand mixer fitted with the dough hook attachment, mix in the GF all-purpose flour, xanthan gum, tapioca starch/flour, granulated sugar, and salt.
- Add in the starter, 1-½ cups of milk, and the butter, and beat on medium speed to combine. This is a batter-style bread dough, so it won’t resemble traditional bread dough, but rather a soft cookie dough. Turn the mixer up to medium-high speed and beat until the dough has taken on a whipped appearance (about 5 minutes). The dough should be tacky to the touch, but should hold its shape when scooped. If your dough feels at all dry to the touch, add more milk by the tablespoon, beating it in until well-combined, until the proper consistency.
- Transfer the dough to the prepared loaf pan. Using a moistened spatula, press the dough into every corner of the loaf pan and spread the top into an even layer. For a more traditional loaf shape, pile the dough a bit more toward the center in a dome. Cover the loaf pan with lightly oiled plastic wrap and allow it to rise in a warm, draft-free place until it’s reached about 150% of its original size, at least 4 hours. It will not fully double in volume, and will rise more in the oven than it does raw. Even traditional yeast bread dough will take longer to rise properly in colder, drier weather and less time in warmer, more humid weather. This wild yeast sourdough bread will take longer to rise than any other, and will depend in part upon the age of your starter.
Rising Tip: This bread dough is much less likely to over proof (pock-marked appearance) so if you’re unsure about whether or not the bread has proofed enough, allow it to keep rising.
- When the bread is nearing the end of its rise, preheat your oven to 400°F. Remove the plastic wrap and, using a sharp knife or lame, slash the top of the loaf from one short end to the other about 1/4-inch deep. Place the pan in the center of the preheated oven and allow to bake for 30 minutes.
- Reduce temp to 350°F, rotate the pan 180° around, and continue to bake until center of the loaf reads 200°F on an instant read thermometer (about 30 minutes more). The crust won’t darken very much, but the loaf should sound hollow when thumped quickly with a finger. Remove the pan from the oven and allow the bread to cool for about 10 minutes in the pan before transferring to a wire rack to cool completely before slicing and serving.
- To freeze the bread, cool the loaf completely, then slice, wrap tightly and freeze the slices. Defrost as many slices at a time as you need in the toaster.
Alternate Part 3 Make GF Sourdough Bread (variation#2 NEW)
Makes 2 Boules
INGREDIENTS for Activating Starter:
1 cup (280 g) cold sourdough starter
1 cup + 2 Tbsps (160 g) brown rice flour
1 cup (225 g) filtered water, @ room-temp
INGREDIENTS for the Dough:
1 ¾ cups (210g) GF oat flour, plus some for dusting
1 cup (120 g) tapioca starch
¾ cup (210 g) potato starch
1 cup minus 1 tablespoon (120g) millet flour
2 teaspoons kosher salt
¼ cup (40 g) psyllium husk powder
¼ cup (25g) flaxseed meal
3 cups (700 g) filtered water, at room temperature
METHOD for Activating Starter 1 Night Before (7pm-ish)
- In a large bowl, stir together the sourdough starter, brown rice flour, and water.
- Cover the bowl with plastic wrap, and set aside at room temperature for 8 – 10 hours, or overnight, until bubbly.
NOTE: There may be some separation, with the top being thick and the bottom more liquid – this is normal.
METHOD for Prepare the Dough (> 4am-ish)
- In the bowl of a stand mixer, whisk together the oat flour, tapioca starch, potato starch, millet and salt.
- In a large bowl mix together the flaxseed and psyllium husk powder and water. The mixture will quickly become thick and gel-like.
- Add this to the dry flour blend along with the sourdough starter.
- Mix with a dough hook medium speed until the dough comes together and all the flour has been incorporated, about 3 minutes.
- Transfer the dough to a lightly floured surface, and cut into two equal pieces (about 2 pounds each).
- Knead each piece lightly, shaping into a ball. The dough should be moist, and hold its shape.
- Dust 2 Dutch ovens with a little flour. Gently transfer the dough rounds into the Dutch ovens with the dough seam facing up.
- Cover the Dutch ovens loosely with plastic wrap and place in a warm spot (ideally between 70 – 75 degrees F) I put it in the oven with the light on. Proof for 3 hours. The dough is ready to bake when it feels springy and soft.
- Approximately 10 minutes before baking, preheat the oven to 500 degrees F.
- Score the dough top two or three times and dust lightly with flour, and add a couple of ice cubes to the side of the dough in each pot.
- Cover the pots with their lids and bake the dough for 45 minutes.
- Uncover, reduce the heat to 450 degrees F, and bake for an additional 50 minutes, until the crusts are dark and the bread sounds hollow when tapped.
- Transfer the boules to a cooling rack, and let them cool COMPLETELY before cutting. This is very important because cooling allows the crumb to set. If you cut too son, the bread will collapse and become gummy. Be patient.
- Store the bread in a brown paper bag at room temperature. It is best eaten within 2 days. You can also freeze the bread once completely cooled for up to 3 months.

