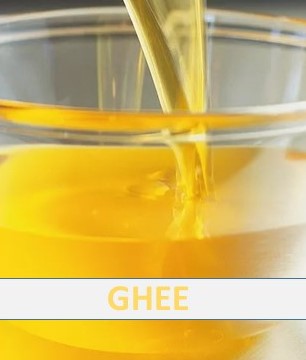
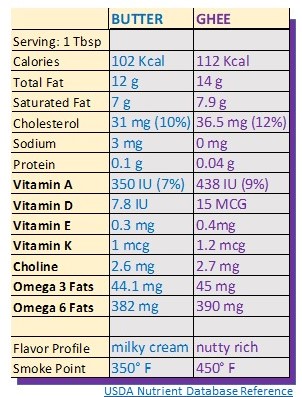
Ghee is becoming more mainstream, as it keeps popping up on newer anti-inflammatory recipes … but what is it? Ghee is a highly clarified butter with all the milk solids removed. This means that certain dairy proteins are removed (like casein and whey), and certain milk sugars are removed (like lactose). This is the traditional fat of many Indian households; my mother made it for her household; and today I make it for my household. It doesn’t seem to be laborious, but is time-consuming; and of course I have short-cutted the process! There are slight nutritional content and taste differences also. The main take-away from this information is that compared to butter: ghee is more nutrient dense, is shelf-stable (doesn’t require refrigeration), has a higher smoke point, and when made correctly – it is free of casein, whey, and lactose. It an acceptable food for those that are lactose-intolerant or sensitive to dairy proteins casein or whey.
Store-bought ghee varies brand to brand on how much casein, whey, and lactose still resides in their end product. There are some brands that batch-test and are suitable for those with sensitivities or intolerance.
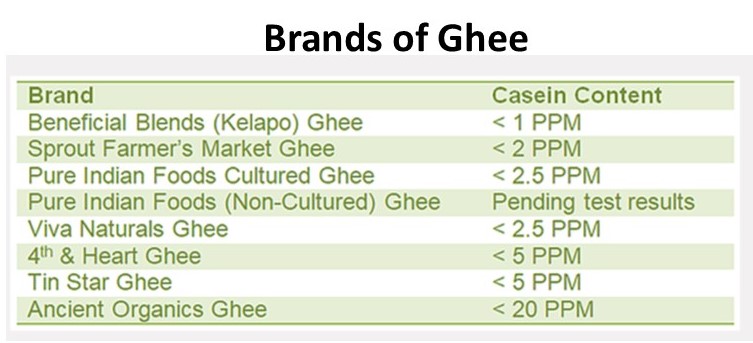
Beneficial blends ghee is one of the best choices for those sensitive to dairy proteins (casein or whey). I don’t get any special favors from them for saying so!
Alternatively homemade ghee is not difficult if you have time to make it. Here’s the best way I know to make it:
INGREDIENTS
- 1 pound (454 g) butter, preferable pastured, grass-fed, organic, & unsalted.
METHOD
- Preheat the oven to 225° F.
- Peel the butter out of the packaging, and place in a large heavy oven-safe bowl.
- Place the bowl into the heated oven.
- Cook for 2 hours. Note: Some of the milk solids may foam to the surface and brown. Bubbling may occur with the foaming, and you may smell a nutty buttery aroma while the water evaporates from the butter. All normal!
- Turn the oven off, and allow it to cool somewhat before handling.
- Remove the bowl from the oven, and skim off the top crust of the milk solids with a strainer or slotted spoon, and discard those solids.
- The remaining mixture is a yellow liquid (ghee) with a white/brown milk solid on the bottom. The white/brown solid is what needs to be removed from this bowl.
- If the milk solids on the bottom are amber/brown, you can begin the separation; otherwise return the bowl to the oven and allow it to continue gently cooking longer until the bottom portion is amber/brown in color. Ensure the milk solids don’t burn.
- Once the milk solids are amber/brown, allow the butter mixture to cool slightly at room approximately 10 minutes.
- Line a large mesh strainer or metal colander with a fine cheesecloth/nut bag/or color-safe fabric, and set the lined strainer over a large metal/glass bowl (heat-safe).
- Slowly and carefully pour the top yellow layer (ghee) into the lined strainer & bowl ensuring that the white/amber milk solids do NOT pour in accidentally. Slow & steady is the trick!
- When you get to the danger zone (when the milk solids may pour), stop pouring the ghee. Set the remainder milk solids + small layer of ghee mixture down for later.
- Transfer the already poured ghee into a clean Mason jar with a lid.
- If you have sensitivities to dairy, you are done. Discard remaining mix that has milk solids in it.
- If you don’t have dairy sensitivities, then you can still get more ghee out of the remaining mix with the following steps.
- Carefully pour the remaining milk solids+ small layer of ghee into a taller glass/ bowl with lid.
- Remove the bowl from the refrigerator. Note that the ghee will have solidified at the top. The milk solids are liquid at the bottom. In order to remove most of the milk solids, use a knife to create a hole from top to bottom (removing a corner will give you the best angle), and tilt the bowl over the sink to discard the milk solids underneath the solid ghee. The ghee should remain firmly as one surface sheet, while the bottom solids should leak out of the hole created.
- Now you are left with a sheet of solid ghee and leftover milk solids which are stuck on the bottom and not able to escape.
- Heat the remaining milk solid residue/ghee mixture in the microwave to liquefy once again.
- Now this mixture can either be used up first (if there is only a small amount left) or place mixture in the refrigerator once again.
- Repeat steps 17-20 until the portion remaining can be used up at one time for a particular dish.
- The ghee in the Mason jar is a pure ghee mixture, free from casein, whey, and lactose. The remaining ghee/milk solids mixture may not be completely free from casein, whey, and lactose but it is good enough to be used in place of butter for any recipe, provided there are no sensitivities/intolerances to butter.
- Ghee is shelf-stable for up to 3 months, or refrigerator-stable for up to 1 year.
